Spring IoC Container
Spring Framework의 핵심 부분이며, Iversion of Controller(IoC) 디자인 원칙을 구현한다.
IoC 컨테이너는 객체의 생명주기와 의존성을 관리하며, Container에 (Spring에서 관리되는 객체)Bean으로 등록된 객체에 대해서 @RequiredArgsConstructor가 호출된 곳에 의존성을 주입해주는 역할을 한다.
Conatainer는 기본적으로 Singleton으로 객체를 관리하며, Container의 적용 범위는 main이 있는 최상위 Package까지로 한정된다.
package com.example.memorydb; // 여기 하위에 있는 객체들에 대해서만 Container에 등록가능

import org.springframework.boot.SpringApplication;
import org.springframework.boot.autoconfigure.SpringBootApplication;

@SpringBootApplication
public class MemorydbApplication {

	public static void main(String[] args) {
		SpringApplication.run(MemorydbApplication.class, args);
	}
}
Bean 등록
상위 클래스에 Configuration Annotation을 사용해서 여기가 설정하는 부분이라고 명시를 해주고 객체를 return하는 곳에 Bean Annotation을 사용해서 Bean으로 등록한다. 이 후 동작은 Container에서 관리하게 된다. 이 방법을 사용하게 되면 Container의 기본적인 주소외에 다른 주소를 사용할 수 있다는 장점이 있다.
@Configuration
public class DataBaseConfig {
    @Bean
    public UserRepository userRepository() {
        return new UserRepository();
    }

}
Annotation 종류
@Component: 일반적인 Component를 Bean으로 등록할 때 사용하며, 기본적으로 다른 Annotation들의 상위 Annotation이다.@Repository: Repository를 Bean으로 등록할 때 사용한다.@Service: Service를 Bean으로 등록할 때 사용한다.@Controller: Controller를 Bean으로 등록할 때 사용한다.@Configuration: 설정을 Bean으로 등록할 때 사용한다.@Entity: Entity를 Bean으로 등록할 때 사용한다.
Bean 주입
class 최상단에 @RequiredArgsConstructor Annotation을 붙여주거나, 아니면 주입 받아야 하는 객체의 상단에 @Autowired Annotation을 붙여준다.
아래의 두 가지 코드는 모두 Container에서 Bean을 주입받는 코드이다.
@Service
@RequiredArgsConstructor // 필요한 Args를 주입받는다.
public class UserService {

    private final UserRepository userRepository;

    public UserEntity save(UserEntity userEntity) {
        return null;
    }

}
Application Context
Container와 교환적으로 사용되는 용어기도 하지만 차이점이 있다. Context는 Spring IoC의 더 고급 버전으로, 엔터프라이즈 특정 동작에 대한 지원이 추가되어 있다. 엔터프라이즈 특정 동작이란 메시지 리소스 처리, 이벤트 발행, 웹 어플리케이션의 컨텍스트와 같은 추가적인 기능을 제공한다.
Memory DB Project
Database를 사용하기 전, 기본적인 Spring CRUD의 구성 방식을 알기 위해서 MemoryDB (opens in a new tab) 프로젝트를 진행했다. 해당 프로젝트의 Diagram은 아래와 같다.
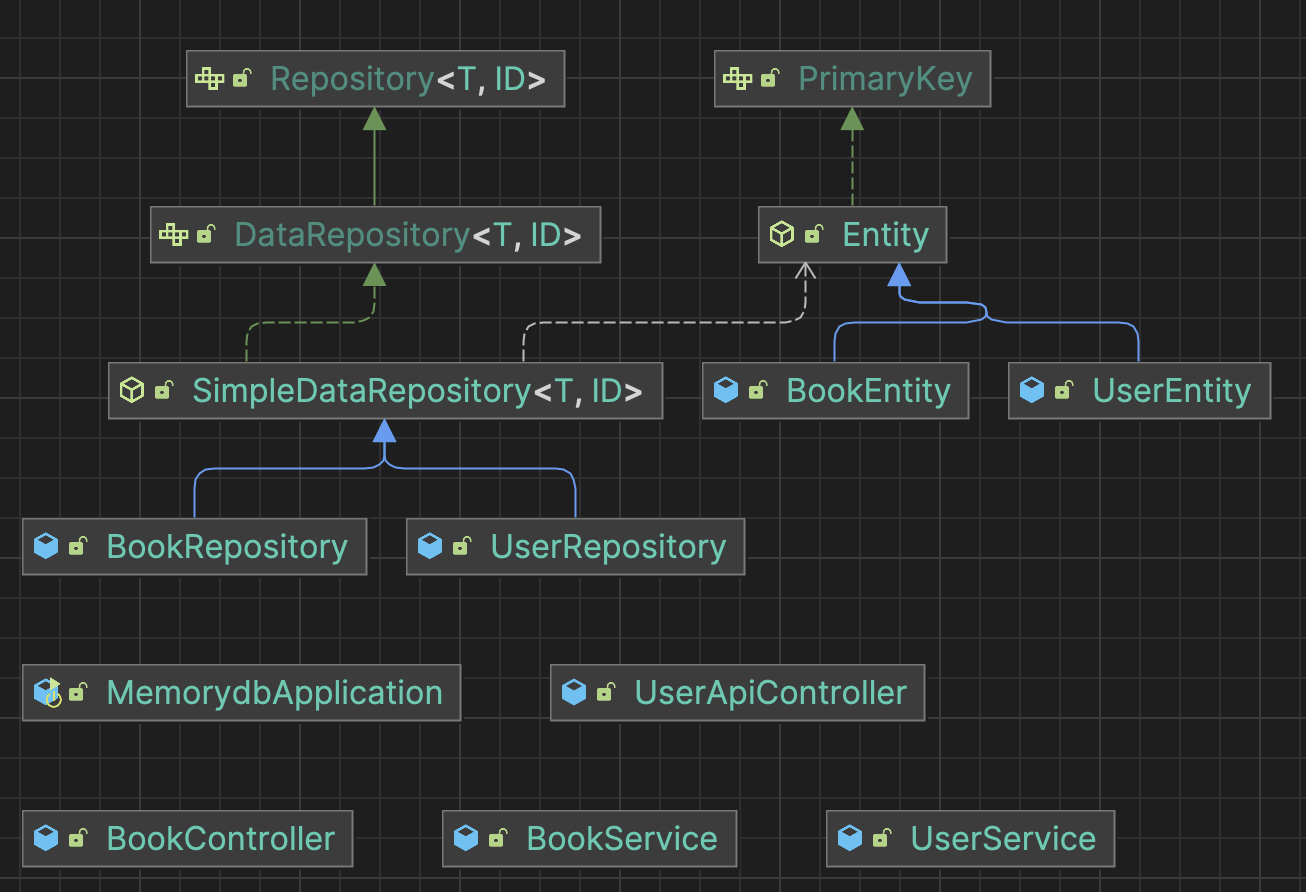
구조는 전체적으로
- Entity : DB의 테이블과 매핑되는 객체
- Repository : Data Source(API 포함)와 연결되어 DB에 접근하는 객체
- Service : Repository에 접근하는 객체
- Controller : RestAPI를 통해서 Service에 접근하는 객체 와 같다.
Entity
Entity는 id를 기본적으로 포함하고 있으며 Entity를 상속받은 객체는 전부 id를 지니게 된다.
@Data
public abstract class Entity implements PrimaryKey {
    @Getter
    @Setter
    private Long id;
}
Repository
Repository Interface는 어떤 Type을 받아줘야 하는지에 대한 기준을 담고 있고 SimpleDataRepository는 Reposiotry에 대한 abstract 구현체로 기본적인 CRUD 기능을 담당한다.
이후 SimpleDataRepository를 상속받아서 추가적인 개별 Repository에 대한 특징적인 다른 기능을 추가할 수 있다.
public interface Repository<T, ID> {}Service & Controller
Service와 Controller에 관해서 간단하게 살펴보자면, Service는 Repository를 Dependency로 주입을 받고 Controller는 Service를 Dependency로 주입받으며 실제로 API 요청시에는 Controller를 통하게 된다.
즉, Front End 입장에서 API 사용시를 보자면
Controller <- Service <- Repository <- Entity <- DB
가 되는 것이다.
@Service
public class UserService {

    @Autowired // Autowired를 사용할 경우 final 키워드를 사용할 수 없음
    private UserRepository userRepository;

    public UserEntity create(UserEntity userEntity) {
        return userRepository.save(userEntity);
    }

    public List<UserEntity> findAll() {
        return userRepository.findAll();
    }

    public void delete(Long id){
        userRepository.delete(id);
    }

    public List<UserEntity> findAllScoreGreaterThen(Integer score) {
        return userRepository.findAllScoreGreaterThen(score);
    }

    public Optional<UserEntity> findById(Long id) {
        return userRepository.findByID(id);
    }
}